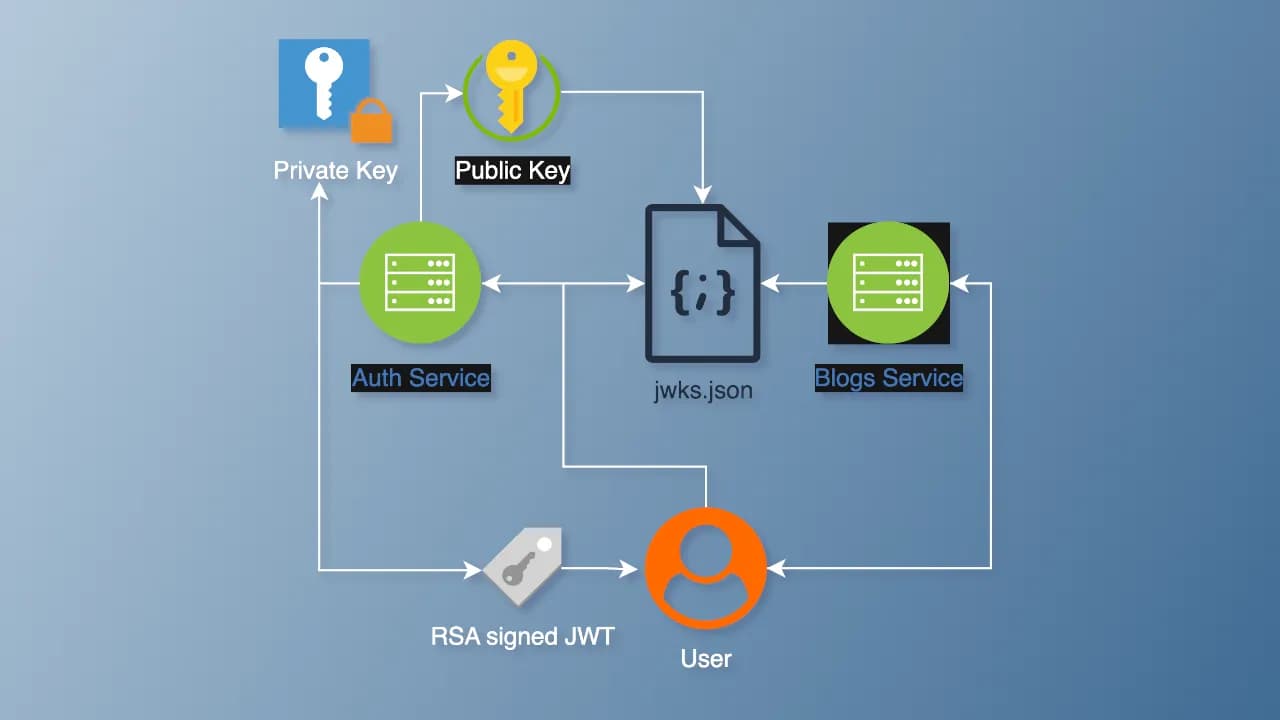
In microservice architectures, secure authentication is essential for maintaining trust between services. JSON Web Tokens (JWTs) are widely used for authentication, particularly in systems requiring a Single Source of Truth (SSOT). By leveraging RSA keys, you can create a secure, scalable, and SSOT-compatible authentication system where one service generates JWTs, and others verify them without creating new tokens. In this blog post, we’ll build such a system using NestJS, with an authentication backend generating JWTs using a private key, exposing a public key via a JWKS endpoint (/.well-known/jwks.json), and enabling other microservices to verify tokens.
This tutorial is aimed at developers familiar with Node.js, NestJS, and basic authentication concepts. By the end, you’ll have a working SSOT-compatible JWT authentication system.
Why Use RSA Keys for SSOT Authentication?
JWTs can be signed with symmetric keys (e.g., HMAC) or asymmetric keys (e.g., RSA). For an SSOT system in a microservices environment, RSA keys are ideal because:
- Security: The private key remains with the authentication service, while the public key is shared for verification, minimizing key exposure risks.
- Single Source of Truth: Only the authentication service generates JWTs, ensuring centralized control over token issuance.
- Interoperability: A JWKS (JSON Web Key Set) endpoint aligns with standards like OpenID Connect, facilitating integration with other systems.
Our goals are to:
- Build an authentication microservice that generates JWTs using a private RSA key.
-
Expose a JWKS endpoint (
/.well-known/jwks.json) to share the public key. - Create a resource microservice that verifies JWTs using the public key, without generating new tokens.
Prerequisites
Before starting, ensure you have:
-
Node.js (v16 or higher) and NestJS CLI installed (
npm i -g @nestjs/cli). - OpenSSL to generate RSA key pairs.
- Basic knowledge of NestJS, JWT, and microservices.
Step 1: Generating RSA Key Pairs
Generate an RSA key pair for signing and verifying JWTs. Run these commands in your terminal to create private and public keys in PEM format:
bash# Generate a 2048-bit RSA private key
openssl genrsa -out private.key 2048
# Extract the public key
openssl rsa -in private.key -pubout -out public.key
Store these keys securely in a keys folder in your authentication service’s root directory. Do not commit these keys to version control.
Step 2: Setting Up the Authentication Microservice
The authentication microservice will generate JWTs using the private key and expose a JWKS endpoint for the public key.
2.1 Create a New NestJS Project
bashnest new auth-service
cd auth-service
2.2 Install Dependencies
Install the required packages for JWT handling and JWKS support:
bashnpm install @nestjs/jwt @nestjs/passport passport passport-jwt jwks-rsa node-jose
npm install --save-dev @types/passport-jwt
2.3 Configure the Authentication Module
Create an auth module to manage JWT generation and the JWKS endpoint:
bashnest g module auth
nest g controller auth
nest g service auth
In src/auth/auth.module.ts, configure the JwtModule with the private key:
typescriptimport { Module } from '@nestjs/common';
import { JwtModule } from '@nestjs/jwt';
import { AuthController } from './auth.controller';
import { AuthService } from './auth.service';
import * as fs from 'fs';
import { join } from 'path';
@Module({
imports: [
JwtModule.register({
privateKey: fs.readFileSync(join(process.cwd(), 'keys/private.key')).toString(),
signOptions: { expiresIn: '1h', algorithm: 'RS256' },
}),
],
controllers: [AuthController],
providers: [AuthService],
})
export class AuthModule {}
2.4 Implement the Authentication Service
In src/auth/auth.service.ts, create a method to generate a JWT after validating user credentials (using a mock user for simplicity):
typescriptimport { Injectable } from '@nestjs/common';
import { JwtService } from '@nestjs/jwt';
@Injectable()
export class AuthService {
constructor(private jwtService: JwtService) {}
async login(user: { username: string; userId: string }) {
const payload = { sub: user.userId, username: user.username };
return {
access_token: await this.jwtService.signAsync(payload, {
algorithm: 'RS256',
keyid: 'my-key-id', // Key ID for JWKS
}),
};
}
// Mock user validation (replace with real database logic)
async validateUser(username: string, password: string): Promise<any> {
const user = { userId: '123', username: 'testuser' }; // Mock user
if (username === 'testuser' && password === 'password') {
return user;
}
return null;
}
}
2.5 Create the Login Endpoint
In src/auth/auth.controller.ts, add a login endpoint to authenticate users and return a JWT:
typescriptimport { Controller, Post, Body, UnauthorizedException } from '@nestjs/common';
import { AuthService } from './auth.service';
@Controller('auth')
export class AuthController {
constructor(private authService: AuthService) {}
@Post('login')
async login(@Body() body: { username: string; password: string }) {
const user = await this.authService.validateUser(body.username, body.password);
if (!user) {
throw new UnauthorizedException('Invalid credentials');
}
return this.authService.login(user);
}
}
2.6 Expose the JWKS Endpoint
Create a new controller to serve the JWKS endpoint using node-jose:
bashnest g controller jwks
In src/jwks/jwks.controller.ts, implement the JWKS endpoint:
typescriptimport { Controller, Get } from '@nestjs/common';
import * as fs from 'fs';
import * as jose from 'node-jose';
import { join } from 'path';
@Controller('.well-known')
export class JwksController {
@Get('jwks.json')
async getJwks() {
const keyStore = jose.JWK.createKeyStore();
const publicKey = fs.readFileSync(join(process.cwd(), 'keys/public.key')).toString();
await keyStore.add(publicKey, 'pem', { alg: 'RS256', use: 'sig', kid: 'my-key-id' });
return keyStore.toJSON();
}
}
Update src/auth/auth.module.ts to include the JwksController:
typescriptimport { Module } from '@nestjs/common';
import { JwtModule } from '@nestjs/jwt';
import { AuthController } from './auth.controller';
import { AuthService } from './auth.service';
import { JwksController } from '../jwks/jwks.controller';
import * as fs from 'fs';
import { join } from 'path';
@Module({
imports: [
JwtModule.register({
privateKey: fs.readFileSync(join(process.cwd(), 'keys/private.key')).toString(),
signOptions: { expiresIn: '1h', algorithm: 'RS256' },
}),
],
controllers: [AuthController, JwksController],
providers: [AuthService],
})
export class AuthModule {}
The authentication service now provides a /auth/login endpoint to generate JWTs and a /.well-known/jwks.json endpoint to share the public key.
Step 3: Setting Up the Resource Microservice
The resource microservice will verify JWTs using the public key from the JWKS endpoint, ensuring it cannot generate new tokens.
3.1 Create a New NestJS Project
bashnest new resource-service
cd resource-service
3.2 Install Dependencies
bashnpm install @nestjs/passport passport passport-jwt jwks-rsa
npm install --save-dev @types/passport-jwt
3.3 Configure the JWT Strategy
Create an auth module and implement a JwtStrategy:
bashnest g module auth
nest g service auth
In src/auth/jwt.strategy.ts, configure the JwtStrategy to fetch the public key dynamically:
typescriptimport { Injectable } from '@nestjs/common';
import { PassportStrategy } from '@nestjs/passport';
import { ExtractJwt, Strategy } from 'passport-jwt';
import { passportJwtSecret } from 'jwks-rsa';
@Injectable()
export class JwtStrategy extends PassportStrategy(Strategy) {
constructor() {
super({
jwtFromRequest: ExtractJwt.fromAuthHeaderAsBearerToken(),
secretOrKeyProvider: passportJwtSecret({
cache: true,
rateLimit: true,
jwksRequestsPerMinute: 5,
jwksUri: 'http://localhost:3000/.well-known/jwks.json',
}),
algorithms: ['RS256'],
});
}
async validate(payload: any) {
return { userId: payload.sub, username: payload.username };
}
}
3.4 Create an Authentication Guard
In src/auth/jwt-auth.guard.ts, create a guard to protect endpoints:
typescriptimport { Injectable } from '@nestjs/common';
import { AuthGuard } from '@nestjs/passport';
@Injectable()
export class JwtAuthGuard extends AuthGuard('jwt') {}
3.5 Configure the Auth Module
In src/auth/auth.module.ts, register the JwtStrategy:
typescriptimport { Module } from '@nestjs/common';
import { PassportModule } from '@nestjs/passport';
import { JwtStrategy } from './jwt.strategy';
@Module({
imports: [PassportModule.register({ defaultStrategy: 'jwt' })],
providers: [JwtStrategy],
})
export class AuthModule {}
3.6 Protect a Resource Endpoint
Create a resource module and a protected endpoint:
bashnest g module resource
nest g controller resource
In src/resource/resource.controller.ts, add a protected endpoint:
typescriptimport { Controller, Get, UseGuards, Request } from '@nestjs/common';
import { JwtAuthGuard } from '../auth/jwt-auth.guard';
@Controller('resource')
export class ResourceController {
@UseGuards(JwtAuthGuard)
@Get('protected')
getProtectedResource(@Request() req) {
return { message: 'This is a protected resource', user: req.user };
}
}
Step 4: Testing the System
- Start the Authentication Service:
bashcd auth-service
npm run start
-
Test the Login Endpoint: Use Postman or curl to send a POST request to
http://localhost:3000/auth/login:
json{
"username": "testuser",
"password": "password"
}
Response:
json{
"access_token": "eyJhbGciOiJSUzI1NiIsInR5cCI6IkpXVCIsImtpZCI6Im15LWtleS1pZCJ9..."
}
-
Verify the JWKS Endpoint: Visit
http://localhost:3000/.well-known/jwks.jsonto ensure the public key is accessible. - Start the Resource Service:
bashcd resource-service
npm run start
-
Test the Protected Endpoint: Send a GET request to
http://localhost:3001/resource/protectedwith theAuthorizationheader:
textBearer <your_jwt_token>
If valid, you’ll see:
json{
"message": "This is a protected resource",
"user": { "userId": "123", "username": "testuser" }
}
Step 5: Ensuring SSOT Compatibility
This system enforces SSOT principles because:
- Centralized Token Issuance: Only the authentication service generates JWTs using the private key.
- Public Key Distribution: The JWKS endpoint allows secure, standardized access to the public key.
- Verification Only: Resource services can only verify tokens, not create them, maintaining the authentication service as the SSOT.
To enhance SSOT compatibility:
- Implement refresh tokens for session management.
- Add token revocation for security (e.g., blacklisting).
- Integrate with an identity provider for production-grade SSOT.
Best Practices
- Secure Key Storage: Use a secrets manager (e.g., AWS Secrets Manager) instead of storing keys in the filesystem.
-
Environment Variables: Configure sensitive data like the JWKS URI using a
.envfile. - Rate Limiting: Limit JWKS endpoint requests to prevent abuse.
- Token Expiry: Use short-lived tokens (e.g., 1 hour) with refresh tokens.
-
Validation: Add
issuerandaudiencechecks in theJwtStrategyfor enhanced security.
Conclusion
Using RSA keys and a JWKS endpoint, you can build an SSOT-compatible JWT authentication system in NestJS. The authentication service acts as the single source of truth, generating tokens with a private key, while resource services verify them using the public key from the JWKS endpoint. This approach ensures security, scalability, and adherence to SSOT principles.
Album of the day: